
I am going to preface this post with this might not be what you think and it is possibly a direction you haven’t thought of yet. I am not against inclusive sizing but I’m not totally for it either. Continue reading to learn why.
When I first started hearing about inclusive sizing for yarn patterns, it was vague and not helpful to me as a designer. “You want everyone to be able to make and wear your pattern.” The idea to make that happen is to grade a pattern to more sizes. I heard 13 adult sizes at one point. And in the grading, the finished piece has to look similar in every size.
I just couldn’t get on board with this. Really? If I design a form fitting, sleeveless top I have to grade it in a way that it looks similar on a person with a 36″ / 90 cm chest AND a person with a 62″ / 155 cm chest? That’s just not going to work.
Here is what I have come to as a designer. I cannot, and I will not try to, be a designer for all people. Period. Why? Because as a stitcher, I know that just because the pattern says the finished piece is 54″ / 135 cm chest, that it won’t look like the 42″ / 105 cm does on the 40″ / 100 cm chest model on my 51″ / 127.5 cm chest. Why? Because I am not built the same way as the model, “just with more padding.” Torso length, cup size and other factors come into play.
I have decided as a designer that it is time for stitcher, designer and editor, education. For stitchers to expect every pattern to fit every person is, honestly, ridiculous. It just isn’t going to happen.
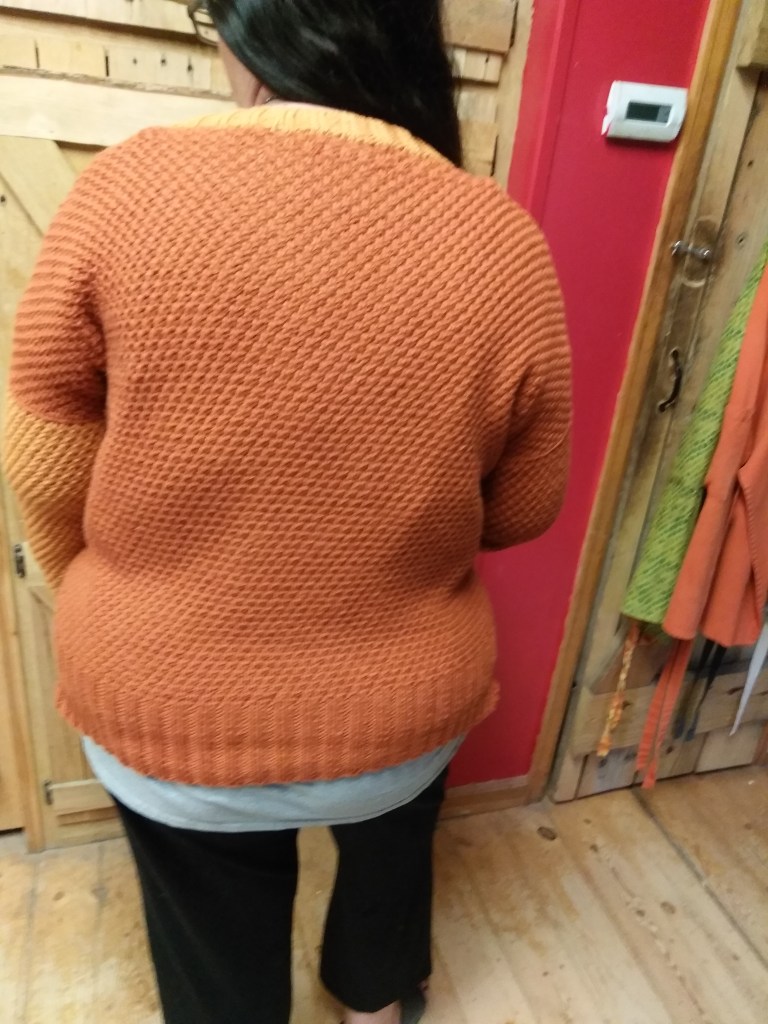
I was a test knitter for a long time, before I started editing. I had been knitting for years but testing is when I started making sweaters. It was testing the sweater pictured below that I finally realized why things didn’t fit the way I thought they should. Click the link below to see how the sweater should fit, the length in particular. In the photo below, I had pulled on the bottom of the sweater trying to make it longer, but it didn’t work. You can see the piece the designer is wearing in the Ravelry link is longer than mine when compared to the sleeves.

Yes, I chose the correct finished size for my chest measurement, however, the sweater is baggier in the back than the front and the length is shortened because of the cup size of my bra. I have learned to stick with the correct chest size but I will probably need to lengthen the body of the sweater, and that’s okay.
Long story short, there are too many variables of how people are made to grade a pattern to fit everyone and it look similar.
I have a friend who is my height, probably a 36″ / 90 cm bust and what is designed to be a crop top would come almost to her hips, because her torso is shorter than average.
Average is the problem. We have measurements and numbers in these size charts. They are derived from the average measurements of a set of people that may or may not represent who the design is for. Are they are good starting point? Absolutely! It will help to save the stitcher time and have more enjoyment from the project and actually want to wear the finished piece.
I am not suggesting that we design in one size and then try to educate the stitcher on how to do the rest. No, instead we design for a broader group than what has been designed for in the past. Chest sizes 28-60″ / 70-150 cm for the person, not finished size. So if there is positive ease the finished piece will measure larger than these numbers. A different size every 2 or 4″ / 5-10 cm depending on the garment and fit.
From there designers and instructors need to educate stitchers to modify the pattern, where and how. Stitchers need to be willing to learn how to do this and not be hand-held stitch-by-stitch.
For example, my daughter is short, 5’4″ / 160 cm tall. She is bustier like me. By the time she has something big enough to go around it is too long for what she wants. She also doesn’t like having extra fabric on her back. There was a pieced sweater she wanted to make, see link below, but we knew it was going to be too long AND too big around. Since it is a pieced sweater, it was easier to modify. We took her measurements with the clothes on that she would wear under this sweater. We then chose which size back to make and which size fronts to make. We looked at the gauge for the pattern and figured out how much shorter she would need to make it. We did that math again after her swatch. Below is her finished sweater. She still wears it.


While there are a lot of voices crying out “More sizes! More sizes!” there aren’t the number of people needed to test these designs before they are published. As a designer and tech editor, I have my designs tested and recommend to my clients that they have their designs tested as well. The reality of that is that we can’t find testers for every size that we have made a design for. The population who actually benefits from the inclusive sizing is smaller than the number of people crying out. That’s great on the one hand we have people advocating for other people but on the other designers are being shunned for not having every size tested. It just isn’t possible to have every size of every design tested. There aren’t enough stitchers or people stitching for other people.
What do I think the answer is? Education! That is often my answer. Learn how to modify the designs that you want to make to fit the body you want to make them for. Designers are not always teachers and in that they need to be given a measure of grace. Many of them do their best to offer designs in many different sizes but that doesn’t mean it will fit everyone. You, the stitcher, need to take the time to educate yourself on how to make the design fit the body you want it to if the designer didn’t give any input on that.
Find a stitching community at a local yarn shop or even a community group, that’s where I learned, and start stitching. If you don’t try, you will never learn.
It’s just yarn, now go make something great!
Happy Making!
